Thursday, March 17, 2011

Demo Fun - Napkins and Dresdens

We had a great time at the last Free Friday Demo and hope all of you that were there did too!

We showed how to make an easy mitred napkin and as promised, here is a pictorial "How To".

For each napkin you will need:
 one 18" square of fabric (this will be the border and back)
one 12" square for the centre


Mark the centre of all four sides of the 18" square with a marking pen or a pin as shown above and below


Do the same thing for all four sides of the 12" square - Best Press Spray Starch works well to get rid of any creases in your fabric (you definitely do not want any creases when you go to do the mitred corners!)


Place the squares of fabric right sides together, raw edges aligned, centre pins matching, and pin all along, leaving a two inch opening for turning. See below.
Begin sewing 1/4" from one end and stop sewing 1/4" from the other end, back stitching at each side of the opening. (Peach pins show the 1/4" start/stop and yellow are the opening - click on any picture to enlarge). Press all seams under border fabric.


Line up the raw edges of the opposite side, matching the centre pins and sew, again beginning and ending 1/4" from each end. Sew all the way across (no opening!). See below.


Match up the raw edges and centre pins for the third side and sew as you did above.

The photo below shows the third side pinned. Sew and repeat for the fourth side.


Pull sides of napkin out so there is an even border all around and each corner has a piece of excessive fabric that forms a kind of upright triangle (like the sail of a ship). Press as crease as shown below.


Carefully pull that triangle free from the back fabric and sew along the crease, ensuring you do not sew beyond the 1/4" connection of the two side seams. See below.


Clip seam and press open. Repeat for all four corners.


Turn napkin right side out through opening you left on first side, press. Stitch with either a straight stitch or a decorative stitch, just to the right of the centre fabric, along the edge, all around the napkin. This will close up the opening as well as stabilize it for laundering.


Bon Appetit!

The other thing we showed was the 18 degree wedge ruler. The Dresden Plate design below was made with 6 1/2" wedges cut from scraps of Christmas fabrics. Once it is appliqued to the background fabric a circle is appliqued over the centre hole.


The ruler is clearly marked and comes with an instruction booklet with lots of ideas and how tos.


The photo below shows (from left to right) a cut wedge, a wedge that has been folded, sewn and trimmed and finally a wedge that has then been turned and pressed.


The ruler makes it easy to create Dresden Plates of many sizes that would be ideal for table centres, table runners and tree decorations not to mention pretty quilt blocks.

We have several in stock - just ask at the counter for yours!

Monday, February 28, 2011

Tissue Case Tutorial


At last Friday's Demo Jill promised to post a tutorial on making these cute little tissue cases and here it is...


you need: one rectangle plain fabric 4" x 8" and one rectangle print fabric 3" x 8"

6 1/2" x 8" fabric for lining

one button and one piece of co-ordinating ribbon, 10" long

pin fabrics together along 8" edges and sew with 1/4" seam allowance; press seam to one side

lay right side up on mat, lining up seam with markings on mat

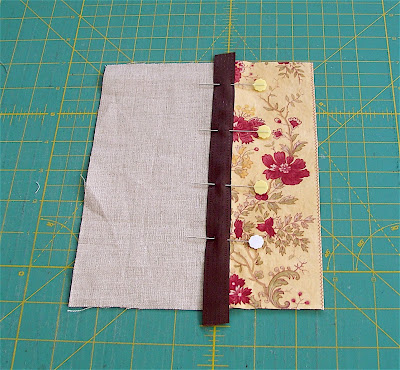
using grid lines on mat, lay ribbon in place, centering over the seam

pin in place - if you wish to add a decorative button, place the last pin about 2" from edge of fabric - sew down each side of the ribbon using matching sewing thread

slide button on to ribbon and pin ribbon end in place

if you don't wish to add a button, sew right to the end

pin front piece and lining right sides together and leave a two inch opening for turning
(refer to green pins in photo above - opening should be on a long edge

sew all around, back stitching at beginning and end, and ensuring the opening is left unstitched - clip all four corners

turn right side out, pressing thoroughly - (don't bother to stitch the opening closed as it will be taken care when the sides are sewn)

lay on mat, right side up and button at the bottom
fold bottom edge up 2" and pin in place

fold top edge down 2" (the edges will overlap slightly) and pin in place

sew side seams with 1/8" seam allowance and very carefully, trim corners slightly

turn right side out and carefully push out corners; press

these are a great way to use up scraps of fabric and ribbons and make wonderful stocking stuffers or little gifts for friends...

Enjoy!

-adapted from Rachel E. Dowd's design in Pretty Little Cozies


Wednesday, February 16, 2011

More Hidden Wells

Two Demos ago we showed the Hidden Wells pattern, and at last week's Demo one of our customer's brought in her version.

A lovely rendition by Marj, using beautiful aquas and mauve.

Marj said she had enough leftovers for an extra block so she made a pillow cover - this design really lends itself to square shapes and it looks fabulous!

And here's a picture of the entire runner.

Hidden Wells is a beautiful, graphic pattern that lends itself to any style of fabric and the more you use the better it gets.

Thanks Marj!

Wednesday, February 9, 2011

Demo Fun

Hello All!

The past two Friday Demos at the shop have featured the Hidden Wells pattern so we thought we'd post a picture of what Jill made for those who weren't able to make it.


This is a fabulous design that looks complicated but is really very simple; it's strip-pieced and goes together in a snap.

We have a free handout available if you want to give it a try and ...

if you make one and email us a picture we'll post here on the blog.

The next free Friday Demo is February 11 - two days away...

Hope to see you there!


Tuesday, January 18, 2011

Hi Everyone
First of all ---Thanks so much to all that took part in our great PICK YOUR DISCOUNT SALE. Wow were we ever busy. We needed that as we have to take stock the end of January.

We are having a BLOCK CHALLEGE. Yes we haven't had one for awhile and they are so much FUN. All you have to do is Buy a packet of Fabric for $5.00, register and make one or two
12 1/2" blocks and have them in the store by Feb. 25. You could win the blocks and 3 meters of Fabric to finish the Quilt. ( Plus the left over fabrics.)
We usually have enough blocks for at least two Quilts.

The other great event I would like to tell you about is our UFO THERAPY CLUB.
We are cleaning up and clearing out and thought maybe we could help you do the same.
We suggest you go through all your unfinished projects and sort them into one's you still like and one's you have no intension of finishing. Don't feel guilty about those WHAT WAS I THINKING OF PROJECT. Pull them out, pattern and all and package them up and donate them to one of the groups that make donation quilts.
In Salmon Arm you can bring them into the store either for the Baby Quilts, The Safe House donation quilts or the Chemo Quilts. We'll disperse them for you.
Next just pick up a Registration Form from The Sewing Basket and enter as many projects as you like. Each entry costs $1.00, and you will have to write a brief description of each one.
You must register by Feb. 28 and you have until Sept 30th to finish your projects. Anything unfinished qualifies as long as it is at least 1 1/2 years old (or older)
For every finished project you bring in you get an entry for all the prizes.

#1 A GIFT CERTIFICATE FOR THE AMOUNT OF ALL THE ENTRIES
#2 A GIFT CERTIFICATE FOR $100 from The Sewing Basket
#3 TO #10 MYSTERY GIFTS (that means Jan just hasn't decided yet)

Are you having Fun Yet? Well join in some of our events or join in some of the classes .
We're always having a great time in the store.

Cheryl is busy opening lots of NEW FABRIC and yes it's still at the same old prices.
Drop in and see all these wonderful fabrics.

See you all soon.

Thursday, September 2, 2010

Fall is just around the corner and we are gearing up for it. Our Class List is out and on our website. There are some very exciting new classes. Check them out. Most samples are up in the store too.

Are you thinking about the new JANOME HORIZON?? Now is your chance to try it out - on Thursday Sept. 9, Darren from Janome will be here conducting a "Test Drive". You can actually have a hands on demo. This is an amazing machine. Call to book your spot. Space is limited.

Don't forget about our OPEN HOUSE & SIGN UP on Saturday Sept. 11. If you sign up for 2 or more classes on or before that date you will get 10% off most registrations.

Monday, June 21, 2010

Breezy Summer Fabrics and a New Bag!


So many new things have come in to the store in the past couple of weeks!

Art to Heart towels are here in several styles and colours - they are perfect for making gift bags, pot holders, aprons and oven mitts. (They are also perfect for drying dishes!)
Almost every book by Nancy Halvorsen features at least one project with these towels and at $3.99 each they are flying out of the store...

Mini quilt from the book Garden Song, a towel and some of the wire hangers we have in stock.


More towels, a rack of Art to Heart fabric and several books...

Click on the picture above to see the stunning colours in this new collection by Jason Yenter from In the Beginning...

Charm Packs and Jelly Rolls of Fig Tree's "Fresh Cottons" line and the latest 30's line called "1933". Below you can see some of the yardage we received of "Fresh Cottons" - it's as fresh as a summer breeze!

And below is a display of fabric packs and patterns for all those who love those charming 30's fabrics!

And here's Jan with her latest bag design! It features one of those gorgeous oriental fabrics and the main bag is constructed of mesh, combining beauty and practicality.The kit will be available in the store this week and you must see this bag to appreciate how stunning it is!

This is a terrific bag for all your shopping needs from groceries to fabric and would even make a fantastic beach bag.

Summer may have finally arrived here in the Shuswap but don't forget to come in and say hello - we have lots of fabulous things to show you!